はてブとか見てると、はやく!速く!高速化!みたいな記事を良く見る。もちろんそれも大事なんやけど、サーバで何が起こってんのかを可視化するのもいいよねー。
wordpressのプラグインを何か入れたとか、設定を変えてみたとか、その時はフムフム上手く行ったと思ってても、1週間後グラフを見てみると明らかにその時点から○○が上がってるってのは良くあること。
ブログ作ったは良いけど、最初に何を書こうかと迷い、インストール中にもnginx+cactiのネタはあんまり見つけられなかったので、こっちを書きます。
cactiとは?
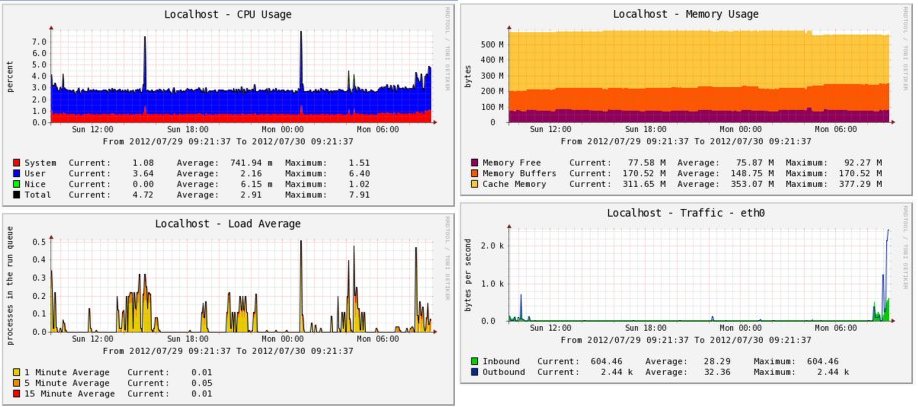
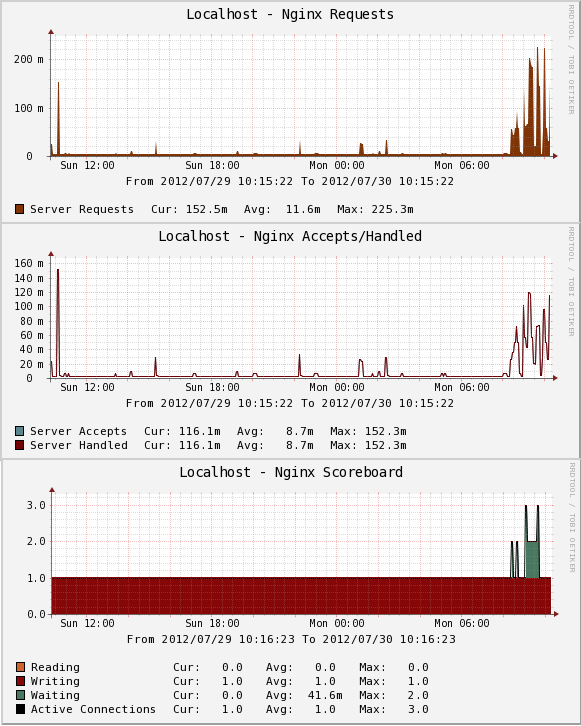
こんな感じのグラフが書けるツールです。vpsとか契約するとCPUやトラフィックのグラフが出ますが、もっと細かく、色んなグラフを出すことが出来ますし、自分でオリジナルなグラフを描くこともできます。どうやらチマタではmuninってのも流行っているらしいけど、変な鳥みたいな奴よりサボテンのが可愛いです(見た目)。
この手の監視ソフトは、何か起こってから/負荷が高い状態になってから入れる物では無く、サービスを始める前から入れとくと普段見えない物が見える化して素敵です。nginxを監視しなくても標準のもんだけでも残しておくと色々捗るかもしれません。
cactiのインストール
ここで中途半端な物を書くよりも、下記を見て貰ったほうが失敗が無かろうかと…
http://centossrv.com/rrdtool-cacti.shtml
ただ、上記と少し変えた点を。
sed -i 's/MyISAM/InnoDB/g' cacti.sql
契約したのはサクラVPSの1GBと言うメモリ貧相プラン。mysqlのmyisamはメモリ最小/innodbにメモリを使うという設定にしたので、使うエンジンをInnoDBに変更。 また、cactiはVersion 0.8.8aやったので、上記インストール手順のcacti-plugin-archは要らへんかった。
nginxでcactiグラフを見るための設定
cactiはapacheに入れてるよって方は抜かしてください。nginx一つで兼用してるって方用です。
で、このグラフ、アクセス制限的なことをして夜な夜な一人で楽しみたいじゃないですか。一緒にセットアップしたphpmyadminをなんとかしたい(こっちがメイン)ので調べてみたけど、残念ながらnginxでは今のところホスト/ドメイン名による規制が出来ない(制限はIPアドレスのみ)とのこと。
企業で固定IPから常につなぐんなら関係ないけど、プロバイダ経由ではIPコロコロ変わるのでIP制限は出来ない。basic_authにしよか迷ったけど、単にディレクトリ名変えるだけにしといた(/1bV1fxlEj6_cactiの部分)。
下記を、server{}の中のどっかに入れておく。
# cacti
location /1bV1fxlEj6_cacti {
 alias /home/web/tools/cacti;
 index index.php;
 }
location ~ ^/1bV1fxlEj6_cacti.+\.php$ {
 fastcgi_pass unix:/var/run/php5-fpm.sock;
 fastcgi_index index.php;
 fastcgi_split_path_info ^/1bV1fxlEj6_cacti(.+\.php)(.*)$;
 fastcgi_param SCRIPT_FILENAME /home/web/tools/cacti$fastcgi_script_name;
 include /etc/nginx/fastcgi_params;
 }
# service nginx restart して、cactiにログインし、グラフが見れることを確認。
nginxでサーバステータスを見れるように設定
nginxのステータスを見れる/server-statusを監視元(今回はlocalhost)から見れるように設定。
server {
 listen 80;
 server_name localhost;
 charset utf-8;

location / {
 return 403;
 }

location /server-status {
 stub_status on;
 access_log off;
 allow 127.0.0.1;
 deny all;
 }
}
確認、
$ service nginx restart
$ curl http://localhost/server-status
Active connections: 1
server accepts handled requests
 888 888 1789
Reading: 0 Writing: 1 Waiting: 0
公式wikiによると、それぞれの意味は
active connections -- number of all open connections including connections to backends
server accepts handled requests -- nginx accepted 888 connections, handled 888 connections (no one was closed just it was accepted), and handles 1789 requests (2.0 requests per connection)
reading -- nginx reads request header
writing -- nginx reads request body, processes request, or writes response to a client
waiting -- keep-alive connections, actually it is active - (reading + writing)
って事らしい。へー。
サーバにnginxを監視するプラグインを入れる(前準備)
nginxの動向を監視!とかはcacti標準の機能では出来ないので、プラグインってのを入れる。
今回は下記を使った(実はmysqlのモニタリングテンプレートを探してたら、おまけでnginxのテンプレートが一緒に入ってた)。コレを入れると他にも、MySQL,Apache,JMX,Apache,OpenVZ,Redis,Linux/Unixの監視グラフが描ける(サンプルは下記サイトで)。
Percona Nginx Monitoring Template for Cacti
http://www.percona.com/doc/percona-monitoring-plugins/index.html
http://www.percona.com/downloads/percona-monitoring-plugins/ (download)
上記サイトから全部入りのpercona-monitoring-plugins-???.tar.gzってのをダウンロードしてサーバで解凍、cactiのscriptsに2つのスクリプトをコピー。
tar xvzf percona-monitoring-plugins-1.0.1.tar.gz
cp scripts/ss_get_mysql_stats.php /var/www/cacti/scripts/
気分としては、これで終わりにしたいけど、ここからがちょっとはまった(説明書を読んでなかった)所。
今回のプラグインはserver-statusをssh経由で取りに行く仕組みらしく、上記のhttpで確認できてたからOKって事では無いらしい。
詳しくは、
http://www.percona.com/doc/percona-monitoring-plugins/cacti/ssh-based-templates.html
に書いてあるけど、監視対象(今回はlocalhost)にユーザ名cactiのssh公開鍵を入れとかなあかん。
ってことで鍵を作る。
# mkdir /var/www/cacti/.ssh
# chown cacti:cacti /var/www/cacti/.ssh
# chmod 700 /var/www/cacti/.ssh
# su cacti
$ ssh-keygen
Generating public/private rsa key pair.
Enter file in which to save the key (/var/www/cacti/.ssh/id_rsa):  エンターキー押すだけ
Enter passphrase (empty for no passphrase):  エンターキー押すだけ
Enter same passphrase again:  エンターキー押すだけ
Your identification has been saved in /var/www/cacti/.ssh/id_rsa.
Your public key has been saved in /var/www/cacti/.ssh/id_rsa.pub.
上記のマニュアルには ssh-copy-id を使えって書いてあるけど、今回はローカルなので、
# su cacti
$ cd /var/www/cacti/.ssh
$ cp id_rsa.pub authorized_keys
$ chown cacti.cacti authorized_keys
$ chmod 700 authorized_keys
ってして、ようやく確認。
今回たてたサーバは気休めにsshdのポートが変えてあるので、-pで指定。
# su cacti
$ ssh localhost -p 12525
 ssh_exchange_identification: Connection closed by remote host
あれー?と思ったら、/etc/hosts.allow に localhostが登録してなかった。
sshd: localhost
と書き加え、
$ ssh localhost -p 12525
The authenticity of host '[localhost]:12525([::1]:12525)' can't be established.
RSA key fingerprint is .
Are you sure you want to continue connecting (yes/no)? yes
Warning: Permanently added '[localhost]:12525' (RSA) to the list of known hosts.
Last login: Fri Jul 20 18:18:17 2012 from localhost
やれやれ。
これでようやく準備が終わり。
サーバにnginxを監視するプラグインを入れる(確認)
今回プラグインが値を取るのに使う ss_get_by_ssh.phpは、
Usage: php ss_get_by_ssh.php --host  --items  [OPTION]

Command-line options ALWAYS require a value after them.  If you specify an
option without a value after it, the option is ignored.  For options such as
--nocache, you can say "--nocache 1".

General options:

   --device          The device name for diskstats and netdev
   --file            Get input from this file instead of via SSH command
   --host            Hostname to connect to (via SSH)
   --items           Comma-separated list of the items whose data you want
   --nocache         Do not cache results in a file
   --port            SSH port to connect to (SSH port, not application port!)
                     port, redis port, or apache port.
                     '--use-ssh 0' then default is --host for HTTP stats too.
   --threadpool      Name of ThreadPool in JMX (i.e. http-8080 or jk-8009)
                     netstat, vmstat (more are TODO)
   --url             The url, such as /server-status, where server status lives
   --use-ssh         Whether to connect via SSH to gather info (default yes).
   --http-user       The HTTP authentication user
   --http-password   The HTTP authentication password
   --openvz_cmd      The command to use when fetching OpenVZ statistics
   --volume          The volume name for df
こんな感じらしいので、下記を試してみてgzとかh0に値が入っていれば成功。-1って値になったら何処かが失敗してます(sshあたりが怪しい)。
# su - cacti -c 'env -i php /var/www/cacti/scripts/ss_get_by_ssh.php --port 12525 --type nginx --host localhost --items gz,h0'
gz:1 h0:1452
で、ココまで書いといてなんですが、高負荷のサーバにsshで毎回取りに行くのってなんだか怖い気がする… が、まぁこのサーバはそんなことにはならないので続けます。
cactiでnginxを監視する為の設定(cactiテンプレート)
percona-monitoring-plugins-?????.tar.gzをPC側にも持ってきて解凍、cactiにログインし、解凍して出てきた
/cactit/emplates/cacti_host_template_percona_nginx_server_ht_0.8.6i-sver1.0.1.xml
をcactiのImport/ExportのImport Templatesでインポート。
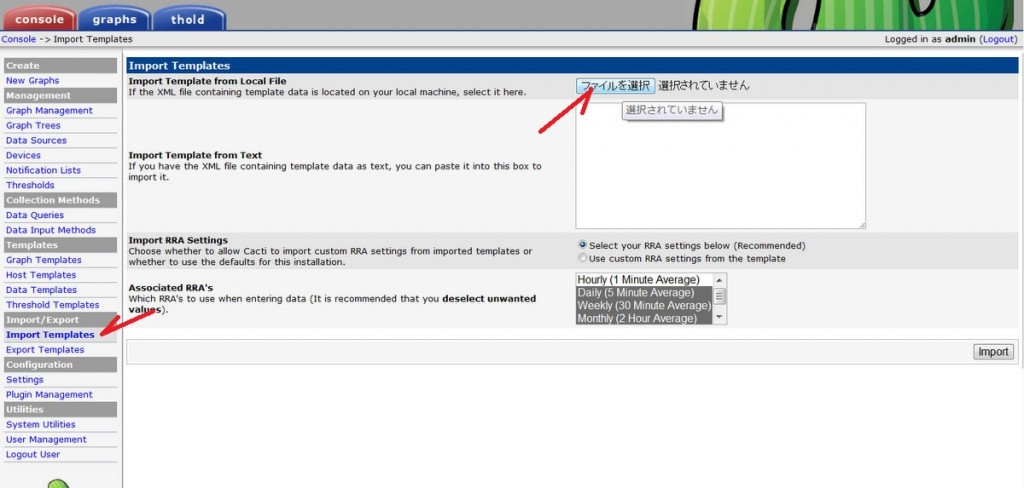
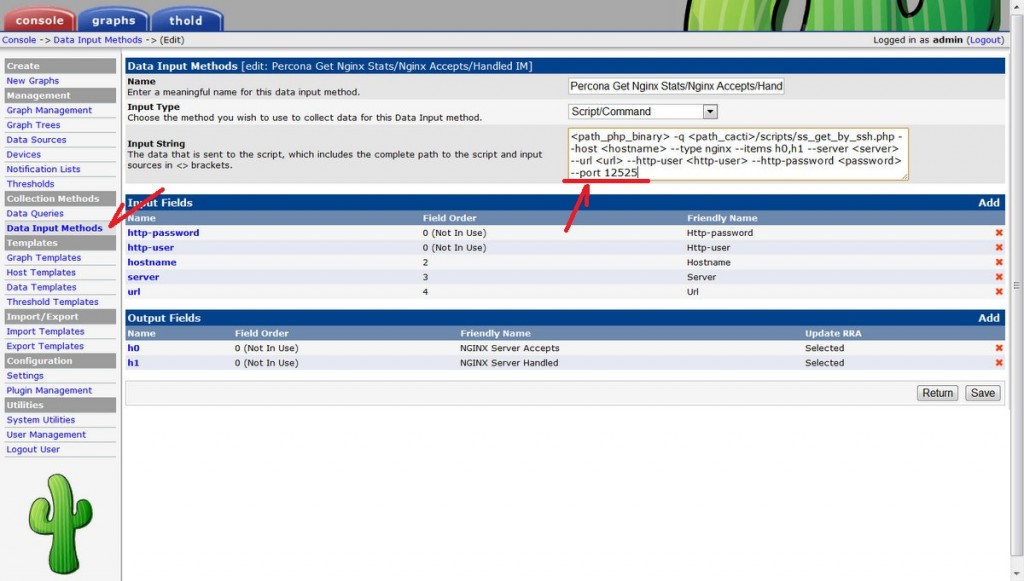
もしsshのポートを変えているようであれば、
Data Input Methods → Percona Get Nginx ????? GT × 3 に—portを追加する。—port <port>ってして、グラフ作るときに入力させることも出来るけど、今回ポートは固定なので、そのまま記述した。
Create New Graphs → サーバ選ぶ → Graph Templates → Percona Nginx ????? GT → Create × 3
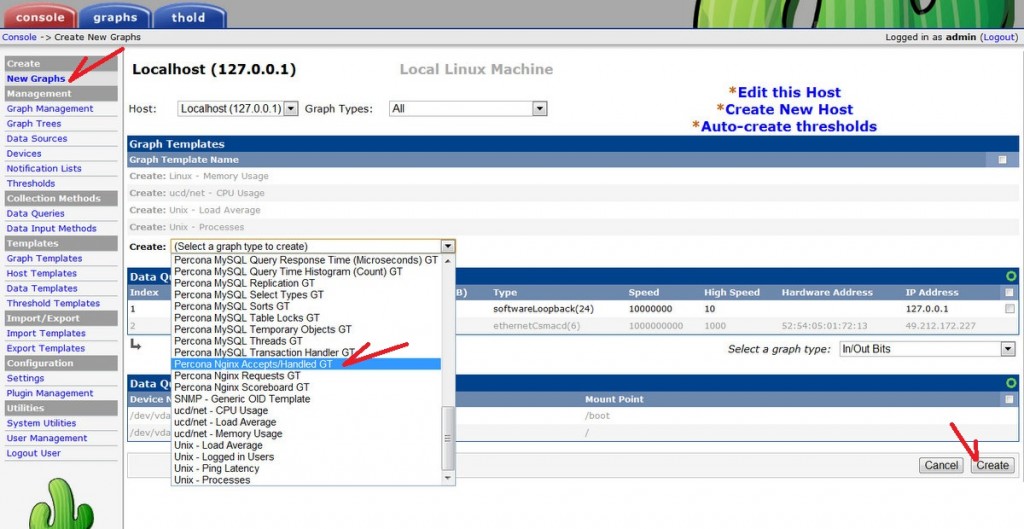
グラフがまともに出てこない場合は、上記の[サーバにnginxを監視するプラグインを入れる(確認)]のあたりをもう一度見直しましょう。
お仕事情報下さい
えー。最後に大事なこと!
もやし工房ではお仕事募集してます。フリーランスでサーバ管理の仕事がしたいけど、そんな需要が東海地方の何処にあるのかが分からない状態。何やら話でも聞いてみたいってかたいらっしゃいましたら、是非 お便り下さい。よろしくお願いします。




コメント